Seeing what happens beneath the surface is one of the most rewarding things an angler can do, and an underwater fishing camera makes it possible without diving gear. With an action camera on a pole, a line or a floating handle, you can watch how a lure moves, how fish react, what the structure really looks like and how clear the water is at different depths. This guide explains how underwater filming works, which setups suit anglers, how to set up your camera for the best picture, how to protect your gear and how to use what you learn to catch more fish. It also covers the safety points that matter when you are leaning over water with expensive equipment.

Why film underwater when you fish?
Underwater footage is more than entertainment. It teaches you things that no screen can show.
See how fish react to lures
Watching a fish follow, hesitate or strike teaches you about speed, depth and presentation. You may find that fish refuse a lure for reasons you never guessed, such as an erratic motion or a visible knot.
Understand cover and structure
Seeing brush, rocks and weeds directly shows how fish use them. It makes the shapes on your fish finder easier to interpret. Pair this with our guide on how to read a fish finder.
Check water clarity
Clarity affects colour choices and how close fish let you approach. A quick look at depth shows how far light penetrates.
Capture memorable moments
Releasing a fish underwater or watching a school pass is a good way to share what lives in your water.
Ways to film underwater
There are several practical approaches.
Camera on a pole
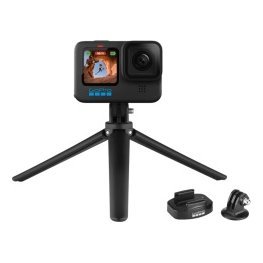
A rigid pole lets you place the camera next to a lure or a piece of structure. It works well from a boat or a dock and gives you control over angle and depth.
Camera on a line
A weighted line or a floating handle with a weight lets you drop the camera to a set depth. It suits deeper water and trolling situations, but control is less precise.
Camera on the rod or lure
Some anglers attach a small camera to a rod or line to watch a lure from behind. This needs a light, streamlined mount and careful testing.
Handheld near the surface
Holding the camera in the water beside the boat is the simplest option. A floating handle makes it more comfortable. See our floating case and handle guide.
Choosing and protecting your gear
Water is hard on gear, so planning matters.
Waterproof rating and housing
Check the camera’s rating and use a housing if the depth or conditions exceed it. Our waterproof case guide explains how to choose.
Seals and maintenance
Inspect seals before each trip and clean them with a soft cloth. A single grain of sand can break a seal.
Buoyancy and tethers
Use a floating handle and a tether so a dropped camera does not disappear. Read our GoPro boat mount guide for tether ideas.
Salt and corrosion
Rinse with fresh water after use, particularly in salt water. See our saltwater protection guide.

Camera settings for underwater video
Water changes light and colour, so adjust your settings.
Resolution and frame rate
Use a resolution and frame rate that give you smooth motion, and consider higher frame rates for slow motion of strikes. Our GoPro settings guide has more.
White balance and colour
Water absorbs red light with depth, making footage look blue or green. Use a suitable underwater mode or a colour filter, and correct colours when editing.
Field of view
A wide field of view shows more of the scene when you are close to subjects. Keep the lens clean for the clearest image.
Lighting
Natural light works best in shallow, clear water. In deeper or darker water, a small light can add colour and detail.
Tips for getting good footage
Technique matters as much as gear.
Wait for clear water
Silt and algae spoil visibility. Choose calm days and clear sections of water.
Keep movements slow
Slow movements keep fish calm and keep the picture steady.
Shoot with the sun behind you
Light from behind the camera lights the scene and reduces glare.
Start recording before you lower the camera
Recording a longer clip prevents missed moments. You can trim later.
Label your clips
Note depth, location and conditions so the footage becomes useful data. Our fishing journal guide shows how.
Safety and good practice
Underwater filming involves leaning over the water, so take care.
Wear a life jacket
Always wear a properly fitted life jacket when you lean over the side.
Keep your balance
Kneel or sit when lowering the camera. Avoid reaching too far on a small boat or kayak.
Respect fish and the environment
Do not disturb spawning fish or damage habitat. Handle fish gently and release them promptly. Our guide to photographing your catch responsibly explains good practice.
Follow local rules
Some waters have rules about filming or fishing methods, so check before you go.

Using what you learn
Underwater footage becomes a tool for better fishing.
- Compare footage with your sonar screen to learn what structure looks like.
- Note how fish respond to different lure speeds.
- Mark waypoints where you saw good cover. See our marine GPS waypoints guide.
- Share findings with friends and fishing partners.
A simple pole-camera setup you can build
You can try underwater filming with very little gear. Take a lightweight telescoping pole or a stiff rod, a clamp or a screw mount that fits your camera and a lanyard that ties to the boat. Fix the camera to the end of the pole, check that the lens points where you want and secure the lanyard. At the dock, lower the pole into the water and watch how it behaves, since a current will push the pole around more than you expect. Adjust the angle, add a little weight if needed and test again before you head out. The whole setup takes minutes, and it gives you a repeatable way to look at your fishing spots.
Match the camera to the conditions
In clear, shallow water, natural light and a standard setup give lovely results. In deeper or stained water, expect less contrast and consider a light. If the current is strong, use a streamlined mount and a weight to keep the camera steady. In every case, record a short test clip and review it before the real session.
Keep a record of what you see
Write notes about depth, structure, water clarity and fish behaviour, and mark waypoints at the spots you film. Over several outings you will build a clear picture of how your water changes through the seasons, and that knowledge pays off in better decisions about where and how to fish.
Finally, remember that filming should never replace attention to safety and fishing itself. Set the camera up, check it, and then go back to enjoying your day.
Frequently asked questions
Can I use a GoPro as an underwater fishing camera?
Yes. Action cameras are designed for water, but check the waterproof rating and use a housing for depth.
How deep can I go?
It depends on the camera and housing, so check the specifications before lowering it.
Will the camera scare fish?
It can, so keep movements slow and give fish time to return.
How do I stop footage looking blue?
Use an underwater setting or filter and correct colour in editing.
Start exploring below the surface
An underwater fishing camera adds a new dimension to your fishing, and it need not be complicated. Choose a safe, secure setup, set your camera for water and take your time. Browse GoPro accessories in our shop, or contact us to discuss mounts and cases for underwater use.
Related reading from Fishtrail Outfitters
- Best GoPro for Fishing: What to Look For and How to Set It Up
- GoPro vs Smartphone for Fishing Videos: Which Camera Should You Use?
- GoPro Boat Mount Guide: Where to Attach Your Camera for Great Fishing Video
- Fishing Video Tips: How to Film Better Catches, Trips and Highlights
Products mentioned in this guide
- Waterproof case for GoPro HERO11 Black Mini camera
- Waterproof case for GoPro HERO12 Black HERO11 Black HERO10 Black HERO9 Black camera
- Magnetic swivel GoPro camera clip
Further reading: GoPro official website · Take Me Fishing: how to get started and where to fish
Questions before you buy? Contact Fishtrail Outfitters or browse the shop.